コード設計を学びたい人におすすめの本はこちら

記事をご覧いただきありがとうございます。
この記事では、Vue でコンポーネント間の通信を実現するために不可欠な props と emit について詳しく解説します。
props のバリデーションや emit との使い分けなども解説しているので、是非学習に役立ててください。


コンポーネントとは
コンポーネントとは、ウェブアプリケーションを構築するための重要な部品です。これは、アプリケーションの異なる部分を分割し、それぞれの部分を再利用可能な小さな部品にまとめる方法です。
英語で学ぶ
Components are < vital building blocks > [ for creating web applications. ] ( ② ) They are a method [ for breaking down different parts [ of an application ] [ into reusable, smaller pieces. ]] ( ② )
( For instance, ) ( by deconstructing UI elements [ such as buttons, forms, menus, cards, headers, etc., ]) you can create a single web page ( by combining the individual components. ) ( ③ )
親コンポーネント / 子コンポーネント
親コンポーネント
親コンポーネントは、他のコンポーネントを含む上位のコンポーネントです。親コンポーネントは通常、子コンポーネントにデータを提供し、子コンポーネントが表示や操作を行うためのプロパティやイベントハンドラを持っています。
英語で学ぶ
A parent component is a higher-level component [ that contains other components. ] ( ② ) Parent components typically provide data ( to child components ) and have < properties and event handlers ( for child components ) [ to display and manipulate. ]> ( ③ )
子コンポーネント
子コンポーネントは、親コンポーネント内に配置され、親コンポーネントからデータを受け取り、それに基づいてUIを描画します。
英語で学ぶ
A child component is a component [ placed ( inside a parent component [ that receives data ( from the parent component )) and draws the UI ( based on it. )]] ( ② )
<template>
  <div>
    <h1>Parent Component</h1>
    <ChildComponent />
  </div>
</template>

<script setup>
import ChildComponent from './ChildComponent.vue';
</script>

<ChildComponent />
<template>
<div>
<h2>Child Component</h2>
</div>
</template>リスニングする
props
props を使用することで、親コンポーネントから子コンポーネントにデータを渡すことができます。これにより、アプリケーションをモジュール化し、再利用性を高め、アプリケーションの異なる部分間でデータを共有することができます。
英語で学ぶ
( By using props, ) you can pass data ( from a parent component to a child component. ) ( ③ ) This allows you < to modularize your application, enhance reusability, > ( ⑤ ) and share data [ between different parts of your application. ] ( ③ )
props の使い方
props の宣言方法
Composition APIでは、子コンポーネントでpropsを宣言し、親コンポーネントからデータを受け取るためにdefineProps() 関数を使用します。
defineProps() 関数は <script setup> を利用する場合のみ利用可能
英語で学ぶ
Composition API uses the defineProps() function [ to declare props ( in a child component )] and receive data ( from the parent component. ) (When using <script setup>) ( ③ )
<template>
  <div>
    <p>{{ message }}</p>
  </div>
</template>

<script setup>
import { defineProps } from 'vue';

const props = defineProps({
  message: String
});
</script>
props は const props = defineProps({ … })という形式を使用して宣言します。defineProps() 内のオブジェクトでは、受け取りたい props の名前とそのデータ型を指定します。この例では、message プロパティのデータ型を String として指定しています。
親コンポーネントから props を渡すには、子コンポーネントを呼び出す際に該当のプロパティに値を設定します。
以下は、親コンポーネントから message プロパティを子コンポーネントに渡す例です。
英語で学ぶ
Props declare ( using the format [ const props = defineProps({ … }). ]) ( ① ) < The object in defineProps() > specifies the name [ of the props [ you want to receive ]] and its data type. ( ③ ) ( In this example, ) < the data type [ of the message property ]> is specified [ as String. ] ( ② )
< To pass props ( from a parent component, )> set values ( in the appropriate properties ( when calling the child component. )) ( ③ )
Below is an example [ of passing the message property ( from a parent component to a child component. )] ( ② )
<template>
  <div>
    <ChildComponent message="Hello from parent!" />
  </div>
</template>

<script setup>
import ChildComponent from './ChildComponent.vue';
</script>
静的 props
静的 props は、固定の値を props としてコンポーネントに渡す方法です。
以下は、静的propsを使用したサンプルコードです。
英語で学ぶ
Static props is a way [ to pass fixed values ( to components [ as props. ])] ( ② ) Below is a sample code [ using static props. ] ( ② )
<template>
  <div>
    <child-component message="Hello from parent!" />
  </div>
</template>

<script setup>
import ChildComponent from './ChildComponent.vue';
</script>
ここで、message プロパティは固定の文字列値(”Hello from parent!”)を持ち、この値は親コンポーネントから子コンポーネントに静的に渡されます。
英語で学ぶ
Here, the message property has < a fixed string value (“Hello from parent!”), > ( ③ ) and this value is passed ( statically from the parent component to the child component. ) ( -③ )
動的 props
動的propsは、コンポーネント内でpropsの値を動的に変更することができます。これは親コンポーネントのデータやコンポーネント内の状態に基づいてpropsの値を更新する場合に使用されます。
動的なpropsを宣言する際には、:プロパティ名またはv-bind:プロパティ名を使用して、プロパティに変数をバインドします。これにより、propsで定義した値が変わるたびに、値を受け取った子コンポーネントも変化します。
以下は、動的propsを使用したサンプルコードです。
英語で学ぶ
Dynamic props allows you < to dynamically change the values [ of props ( within a component. )]> ( ⑤ ) This is used ( to update the values [ of props ] ( based ( on parent component data or state ) ( within the component. ))) ( -③ )
( When declaring dynamic props, ) you can use ‘:property-name‘ or ‘v-bind:property-name‘ ( to bind a variable ( to the property. )) ( ③ ) ( In this way, )( whenever < the value [ defined in props ]> changes, ) < the child component [ that received the value ]> will also change. ( ① )
Below is a sample code [ using dynamic props. ] ( ② )
<template>
  <div>
    <ChildComponent :message="dynamicMessage" />
  </div>
</template>

<script setup>
import { ref } from 'vue';
import ChildComponent from './ChildComponent.vue';

const dynamicMessage = ref('This can change!');
</script>
props バリデーション
propsのバリデーションでは、データ型だけでなく、値の条件や制約も指定できます。これにより、特定の値が受け入れられるかどうかを制御できます。
以下は、値の制約を含むpropsのバリデーションのサンプルコードです。
英語で学ぶ
( In props validation, ) you can specify not only the data type but also conditions and < constraints [ on the values. ]> ( ③ ) This allows you < to control ( whether specific values are accepted. )> ( ⑤ )
Here is a sample code [ with value constraints [ included ( in props validation. )]] ( ② )
<template>
  <div>
    <p>{{ message }}</p>
  </div>
</template>

<script setup>
import { ref } from 'vue';

// propsのバリデーション
const props = withDefaults(defineProps({
  message: {
    type: String,
    required: true,
    validator: (value) => {
      return value.length <= 20;
    }
  }
})
);
const message = ref(props.message);
</script>
messageプロパティのpropsバリデーションで、以下の制約が指定されています
typeプロパティ:messageは文字列である必要があるrequiredプロパティ:messageは必須であるvalidatorプロパティ:messageの長さは20文字以下での必要がある。
これにより、messageプロパティは文字列であり、必須であり、20文字以下である必要があります。これらの制約に違反する場合、Vueは以下のような警告を生成します。
[Vue warn]: Invalid prop: type check failed for prop "message". Expected String, got Number.英語で学ぶ
< The message property’s props validation > specifies the following constraints. ( ③ )
typeproperty:The message property’s must be a string. ( ② )requiredproperty:The message property’s is a required. ( ② )validatorproperty:< The length [ of the message ]> must be 20 characters or less. ( ② )
This means < that the message prop must be a string, it‘s required, > and its length should not exceed 20 characters. ( If < any of these constraints > are violated, ) Vue will generate a warning. ( ③ )
リスニングする
emit
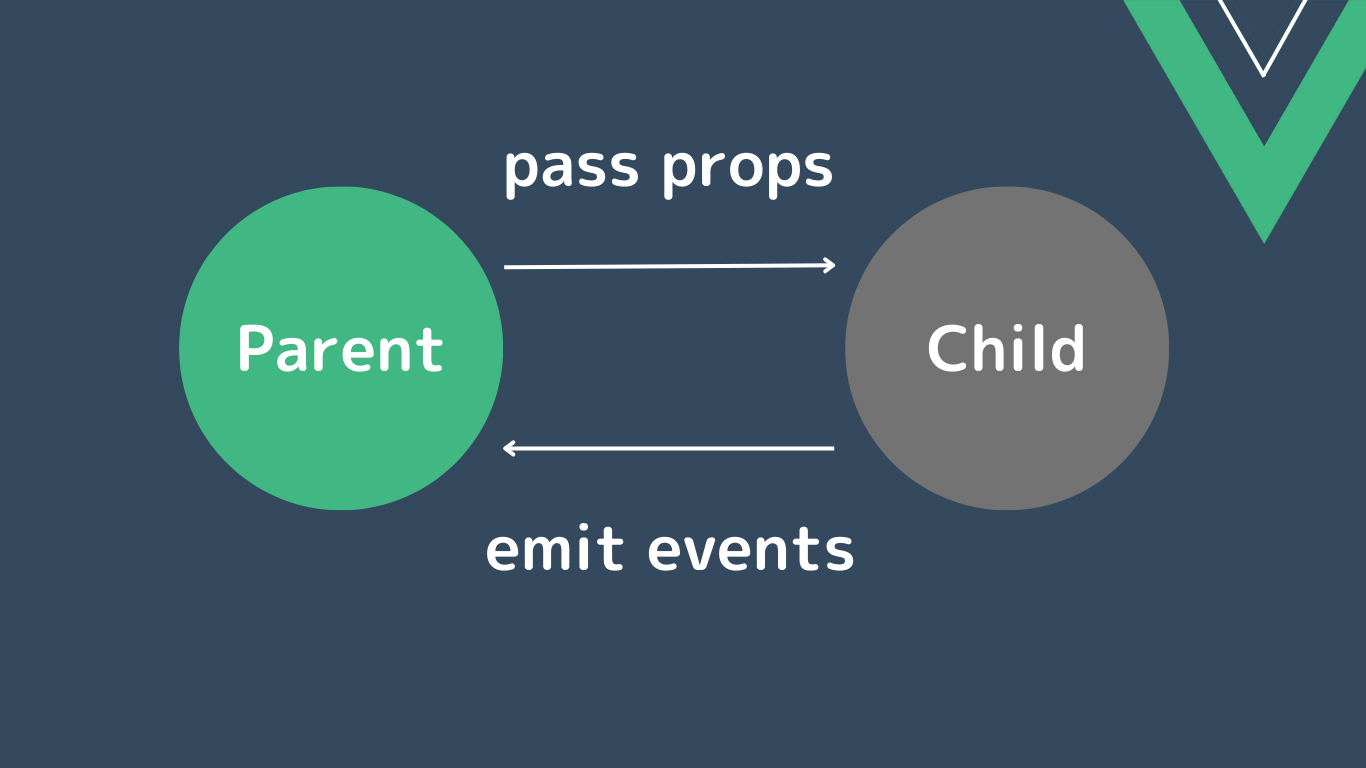
emit ではイベントを利用し子コンポーネントから親コンポーネントに通知を行い、イベントと一緒に親コンポーネントにデータを渡すことも可能です。
英語で学ぶ
emit uses events ( to notify parent component ( from child components. )) and can also pass data ( to the parent component ( along with the event. )) ( ③ )
emit と props の違い
データの方向
propsは親コンポーネントから子コンポーネントにデータを渡すために使用され、データの流れは親から子への一方通行です。子コンポーネントは、props 経由で提供されるデータを読み取り専用として受け取ります。(子コンポーネント内で props の変更をすると警告が出ます)
emitは子コンポーネントから親コンポーネントにイベントを発信するために使用され、データの流れは子から親への一方通行です。子コンポーネントは親コンポーネントにデータやイベントを送信できます。
英語で学ぶ
props is used ( to pass data ( from a parent component to a child component, )) ( -③ ) and the data flow is unidirectional, ( from the parent to the child. ) ( ② ) Child components receive data [ provided ( via props ) ( as a read-only. )] ( ③ ) (< Attempting to modify props within a child component > will result ( in a warning. ) ( ① ))
emit is used ( for child components to emit events to the parent component, ) ( -③ ) and the data flow is unidirectional, ( from the child to the parent. ) ( ② ) Child components can send data or events ( to the parent component ( using emit. ) ( ③ )
emit の使い方
emit は、子コンポーネントから親コンポーネントに対してカスタムイベントをトリガーするために使用されます。このメソッドは2つの引数を取ります。以下にそれぞれの引数について説明します。
第一引数はトリガーしたいイベントの名前を指定します。この名前は文字列として渡され、子コンポーネントから親コンポーネントに送信されるイベントを識別します。
第二引数はイベントに関連付けたいデータを含めます。これは子コンポーネントから親コンポーネントに渡すデータです。この引数は省略可能で、必要に応じて使用します。データは任意の型 (文字列、オブジェクト、数値など) で渡すことができます。
以下は、ボタンを含む子コンポーネントが親コンポーネントにメッセージを送信する例です。
英語で学ぶ
emit is used ( to trigger custom events ( from a child component to a parent component. )) ( -③ ) This method takes two arguments. ( ③ ) Each argument is explained below. ( -③ )
The first argument specifies the name [ of the event [ you want to trigger. ]] ( ③ ) This name is passed ( as a string ) ( -③ ) and identifies the event [ sent ( from the child component to the parent component. )] ( ③ )
The second argument contains the data [ you want to associate ( with the event. )] ( ③ ) This data can be passed ( from the child component to the parent component. ) ( -③ ) This argument is optional ( ② ) and is used ( as needed. ) ( -③ ) You can pass data [ of any type ] (strings, objects, numbers, etc.) ( ③ )
Below is an example [ where < a child component [ with a button ]> sends a message ( to the parent component. )] ( ② )
<template>
  <div>
    <p>{{ message }}</p>
    <ChildComponent @sendMessage="updateMessage" />
  </div>
</template>

<script setup>
import { ref } from 'vue';
import ChildComponent from './ChildComponent.vue';

const message = ref('');

const updateMessage = (newMessage) => {
  message.value = newMessage;
};
</script>
上記の親コンポーネントは、messageというリアクティブな変数を持ち、updateMessageメソッドを使用してメッセージを更新します。
次に、子コンポーネントを作成し、メッセージを送信するためにemitを使用します。子コンポーネントのコードは以下の通りです。
英語で学ぶ
The parent component above has a reactive variable [ called message ] and updates the message ( using the updateMessage method. ) ( ③ )
Next, create the child component and use emit ( to send the message. ) ( ③ ) < The code [ for the child component ]> is below. ( ② )
<template>
  <div>
    <button @click="sendMessageToParent">Send Message to Parent</button>
  </div>
</template>

<script setup>
import { ref } from 'vue';

const sendMessageToParent = () => {
  const newMessage = 'Hello from Child!';
  emit('sendMessage', newMessage);
};
</script>
子コンポーネントのsendMessageToParentメソッド内で、emitを使用して、’sendMessage’というイベントを発火させ、親コンポーネントにnewMessageを送信しています。
親コンポーネントのupdateMessageメソッドは、子コンポーネントからのイベントを受信し、メッセージを更新します。このように、emitを使用して親と子コンポーネント間でデータをやり取りできます。
英語で学ぶ
( In the child component, ) ( within the sendMessageToParent method, ) you use emit ( to trigger an event [ called “sendMessage” ]) and send the newMessage ( to the parent component. )( ③ )
< The updateMessage method [ in the parent component ]> receives events ( from the child component ) and updates the message. ( ③ ) ( In this way, ) data can be exchanged ( between the parent and child components using emit. ) ( -③ )
リスニングする
この記事に出てきた英語5選
- result in… →(結果的に)~をもたらす、~につながる、~に終わる
- unidirectional… → 一方向
- as needed… → 必要に応じて
- not A but also B… → AだけでなくBも
- In this way… → このようにして


